Beetroot Hummus

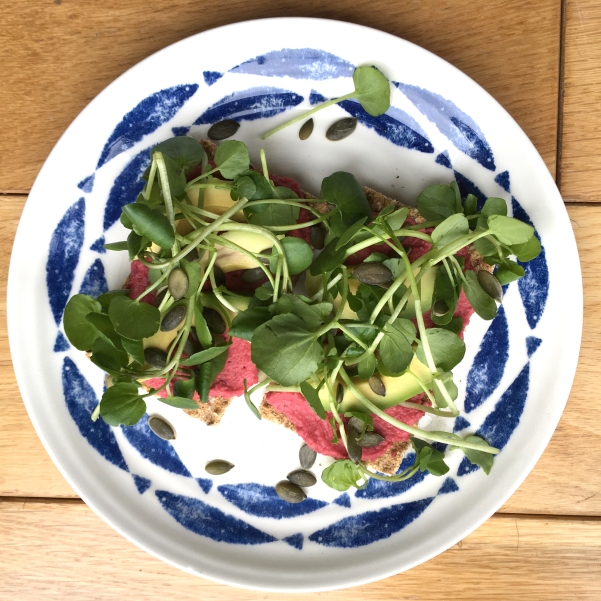
Bright pink and full of flavour; one of my all time favourite summer dips. For the last few months there has been a constant supply of this incredibly photogenic hummus in my fridge as I fill myself up with it between meals. Without the beetroot, you have your bog-standard hummus recipe. The addition of this purple vegetable adds all sorts of benefits and a pop of colour too!!

I generally layer this on top of ryvita or some other wholegrain crispbread with some greens for a mid day munch (plus the bright green and pink looks WOW). It also works great on the side of salads or in wraps and sandwiches – even good enough to cheekily dip your finger in when no one is watching.

Making your own hummus rather than buying it ready made is always better as you can control the amount of salt and oil that goes in, plus it is much more friendly on the student budget: 40p a can of chickpeas ≈ nearly 2 tubs of shop bought humus (£1.80). This recipe typically lasts up to five days but I find it is usually long gone by then!

Instead of beetroot you could add almost anything, I recommend blending it with sundried tomatoes for a Mediterranean vibe or herbs such as coriander for something fresh.

 Ingredients

  • 400g Tin of Chickpeas
  • 1 Lemon
  • 3 Cooked and Peeled Beetroots
  • 2 Garlic Cloves
  • 2 tbsp. Olive Oil
  • 1 tsp. Salt
  • 1 tbsp. Tahini

Method

  1. Chop the beetroot up into chunks and crush the garlic so there are no big pieces in your hummus – there is nothing worse than biting into raw garlic!
  2. Drain and rinse the chickpeas and add the the blender along with the juice from the lemon, chopped beetroots, garlic, olive oil, salt and tahini.
  3. Whizz it all together until it forms a smooth consistency and it has all turned pink. If your blender is having any trouble mixing it then add a splash more olive oil or water if you want a lower fat version.
  4. Then serve! It’s as simple as that yet looks so impressive that you have made your own.


Beetroot hummus full res.jpg

10 Minute Vegan Paella

All the Spanish flavours made so much faster with one secret ingredient… Microwaveable rice. I kid you not, this paella can be whipped up as quick as a flash and of course with just veggies there is no need to waste time over meat slowly cooking away.

This trick was inspired by The Body Coach’s ‘Lean in 15’ chicken and prawn paella but with a vegan twist so anyone can enjoy it. Using only one pan too, it is perfect for those lazy people like me that avoid washing up like the plague. It can also include any vegetables you have in your fridge if you cut them small enough so that they will cook in time.

Ingredients (serves 1)

  • 1/2 Packet Microwave Long Grain Rice (30p)
  • 4 White Mushrooms (18p)
  • 1/3 Courgette (13p)
  • 3 Cherry Tomatoes (11p)
  • 1 Garlic Clove (4p)
  • 2 Spring Onions (12p)
  • 50g Frozen Peas (4p)
  • 1/2 tsp. Turmeric (2p)
  • 1/2 tsp. Smoked Paprika (2p)
  • 100ml Vegetable Stock (1p)
  • 1 tsp. Vegetable Oil (1p)
  • 1/4 tsp. Salt (1p)
  • Pinch of Saffron (Optional)

Total cost 99p per portion. (All prices based on the products in Tesco at time of blog post)

Method

  1. Heat the oil in a frying pan and add the finely chopped or crushed garlic.
  2. Slice into small pieces the spring onions, courgettes and mushrooms and stir into the pan, mixing regularly.
  3. Combine the vegetable stock, turmeric, paprika and saffron (if using) together in a cup/bowl.
  4. After five minutes add the frozen peas, rice from the packet, salt and the stock mix into the pan.
  5. Let simmer away until most of the liquid has evaporated whilst stirring occasionally, adding the quartered cherry tomatoes at the last minute so that they hold their shape

I love to serve this with fresh coriander on top that I grow in my room and chilli flakes if I am feeling brave but it is just as good by itself. If you are interested in the original recipe then I have included it below:


Smashed Chickpea Sandwich

Flavoured with chipotle, these are not your average chickpeas but instead glorious, smoky goodness. Rather than attempting the ‘mock-tuna’ craze at the moment, it uses minimal ingredients to neither overcomplicate the flavours or overspend.

As an extremely busy and constant stress ball of a student, I need quick and filling food that I can take with me to university and happily munch on at lunchtime. This sandwich is one of those lifesavers where you can make the chickpea mix ahead of time and just throw it between two slices of bread with a lettuce leaf or two and job done. Plus do I even need to go through the benefits of chickpeas? Full of protein to keep you feeling fuller for longer. I even struggle to finish this entire sandwich in one go!…and that’s not like me at all.

I fully recommend investing in some chipotle paste as it makes any dish absolutely, lip-smacking gorgeous! Whether you want to throw it into a bean chilli, a lentil soup or indeed, a chickpea sandwich – how can you not resist those smoky, spicy flavours of Mexico? Plus an entire jar only costs £1.65 from Sainsbury’s and will last you (depending if you’re as addicted as me) several months.

IMG_1469 edit.jpg

Ingredients (makes 2 big sandwiches)

  • 1 Tin Chickpeas (50p)
  • 2 tsp. Chipotle paste (21p)
  • 1/2 Red Onion (8p)
  • 1 tbsp. Lemon Juice (4p)
  • 1 tsp. Salt (2p)
  • 4 Slices of Bread (13p)
  • Salad (18p)
  • Vegan Mayonnaise (20p)

Total cost £1.36, which turns out as 68p per sandwich. (All prices based on the products in Tesco, apart from the chipotle paste, at time of blog post)

Method

  1. Drain and wash the chickpeas, then mash them in a bowl with a fork.
  2. Chop the red onion very finely.
  3. Add the onion, chipotle, lemon juice and salt into the bowl and thoroughly mix through.
  4. As an option you could toast the bread for a better held sandwich then spread the mayonnaise on the slices.
  5. Fill with your choice of salad and then the chickpea mix.

Et voila! A super simple recipe for an easy lunch to have on the go. If you’re feeling very lazy and don’t want to get the chopping board out then swap the red onion and salt for onion salt – a cheat I regularly use.

Fresh Spring Spaghetti

With the sun finally making an appearance this year, albeit a brief visit, us Brits decide it’s suddenly summer with the pimms, sun cream and legs all out. In celebration of probably the only half decent weather there will be for months, a crisp bowl of zingy spaghetti is what we all need to enjoy whilst soaking up the rays.

This recipe defines all things spring: fresh British vegetables, zesty lemon and a good bit of garlic to keep those taste buds interested. Taking no more than fifteen minutes to whip up, minimum time is needed to be spent indoors allowing maximum time getting that vitamin D and scoffing all that Easter chocolate.

Ingredients 02

Ingredients (serves 2)

  • 75g Dried Whole Wheat Spaghetti (15p)
  • 100g Chopped Curly Kale (40p)
  • 25g Pine Nuts (64p)
  • 1 Courgette (38p)
  • 1 Lemon (30p)
  • 1 Onion (16p)
  • 1 Garlic Clove (4p)
  • 1 tbsp. Capers (31p)
  • 1 tbsp. Fresh Basil (18p)
  • 2 tbsp. Olive Oil (12p)
  • 1 tsp. Salt (2p)

Total cost £2.70, which turns out as £1.35 per portion. (All prices based on the products in Tesco at time of blog post)

Method

  1. Cook the spaghetti in a saucepan of boiling water for ten minutes, adding the kale after 7 minutes and ensuring all thick stems have been removed.
  2. Whilst the spaghetti is cooking, finely slice the onion, garlic and capers and sauté on a low temperature with 1 tablespoon of the olive oil. Make sure to stir constantly so that it doesn’t burn or stick.
  3. Once the onions begin to go transparent, toss in the pine nuts and gently toast for a further 2 minutes.
  4. Grate the courgette and add to the pan along with the salt, continuing to stir so that everything cooks evenly.
  5. After the spaghetti and kale have cooked through, drain the water and incorporate into the courgette mix with the juice and zest of the lemon, remaining olive oil and finely chopped basil leaves.
  6. Heat through for another minute and serve.

I topped mine with extra pine nuts and Tesco’s Italian style hard cheese alternative as a serving suggestion but it is still as tasty by itself or basil scattered all over.

Lebanese Lentil Soup

Inspired by middle Eastern flavours, this soup uses all the odds and ends hanging about at the back of your cupboard that can quickly turn into a delicious lunch or light dinner. I first encountered this combination of spices at my university’s Vegetarian Society where we cooked mujadara for 50 people, a famous Lebanese dish of rice and lentils topped with caramelised onions and parsley. At first I turned my nose up at the thought of such a bland dish but I was pleasantly surprised at what a hearty flavour the spice mix gave. (Plus a good pinch of salt doesn’t half help to give that bit of oomph lentils are in dire need of).

Don’t be scared of using such strong flavours either, even if you’re a fellow cloves hater like me, they give a subtle warmth in the background which compliments everything else going on without overpowering.

Close up edit bright.jpg


Ingredients (serves 1)

  • 100g Dried Green Lentils/Lentilles Vertes (23p)
  • 1/2 Onion (8p)
  • 1 Garlic Clove (4p)
  • 1/2 Lemon (15p)
  • 1 tsp. Vegetable Oil (1p)
  • 1/2 tsp. Ground Coriander (2p)
  • 1/2 tsp. Ground Cloves (2p)
  • 1/4 tsp. Salt (1p)
  • Pinch of Cinnamon (1p)
  • 450ml Vegetable Stock (5p)
  • Milk/Cream to taste

Total cost 62p, which could be made even cheaper (roughly 51p overall) by using 1 tablespoon of bottled lemon juice as a substitute for the fresh fruit. (All prices based on the products in Tesco at time of blog post)

Method

  1. Bring a pan of water to the boil and add the lentils to simmer, occasionally stirring to make sure they do not stick to the bottom.
  2. Meanwhile finely chop the onion and crush the garlic.
  3. Drain and wash the lentils once they have been simmering for 20 minutes, leaving to one side.
  4. Heat the olive oil in a pan and add the onion and after a minute the garlic, letting them sweat until translucent. Add a splash of water if it looks like it is going to burn.
  5. Mix in the spices until fully incorporated then pour in the vegetable stock, lemon juice, lentils and salt.
  6. Let boil for a further 10 minutes.
  7. Once everything is soft, blend using a food processor or hand blender until smooth then mix in the dairy free milk or cream if desired. (I used Oatly oat cream as I was feeling extra luxurious).

I served mine with steamed kale for extra protein but any greens will do to give you that boost.


Moorish Bean Chilli

A simple and incredible easy recipe made from all the odds and ends stored in the cupboard. This can be made in big batches and easily frozen to keep for a month or so. Recipes like these are particularly useful within exam periods or when you’re overwhelmed with work as it produces many meals with minimum washing up (a bonus for me!).

I highly recommend the kidney beans in chilli sauce, a trick that my mum taught me, as the sauce adds a richness to the dish and a gentle heat. If you like it really spicy then feel free to go wild with the cayenne pepper or you could even add in some chilli flakes.

Ingredients (serves 4)

  • 150g Mushrooms (45p)
  • 3 Garlic Cloves (12p)
  • 1 Onion (16p)
  • 1 Carrot (6p)
  • 1 Tin Chopped Tomatoes (31p)
  • 1 Tin Kidney Beans in Chilli Sauce (55p)
  • 1 Tin Cannellini Beans (50p)
  • 1 tbsp. Smoked Paprika (8p)
  • 1 tsp. Cumin (3p)
  • 1/2 tsp. Cayenne Pepper (2p)
  • 1/2 tsp. Salt (1p)
  • 1 tbsp. Vegetable Oil (2p)

Total cost £2.31, which turns out as just under 58p per portion. (All prices based on the products in Tesco at time of post)

Method

  1. Peel and roughly chop up the onion, mushrooms and carrot into small 1cm chunks and finely slice/crush the garlic cloves.
  2. Heat the oil in a saucepan on a medium-high heat and add the onions and garlic, stirring constantly until the onions begin to go transparent.
  3. Toss in the carrot, mushrooms and spices, stirring to ensure everything is evenly distributed.
  4. Drain and wash the cannellini beans but not the kidney beans, you need the sauce for flavour.
  5. Mix in all the remaining ingredients into the pan and lower the heat so it is gently simmering.
  6. Leave to reduce down and soften the carrots for 20 minutes, ensuring to stir every few minutes so it doesn’t stick to the bottom. Add in any water if it begins to look dry.

Serve with either rice, a jacket potato or tortilla, I usually use jasmine rice as I prefer the soft texture and find it so much more flavourful compared to other types.

Baked Veggie Spring Rolls

Filo pastry is seriously underrated. It’s perfect, a type of pastry that has NO FAT in it. What more could you ask for? I usually buy it in bulk and freeze it to cut costs but either way it’s still pretty easy on the price. Having experimented with so many different filo pastry dishes this was by far my favourite, substituting rice paper in spring rolls for the more common filo pastry allows you to not spend extra money on something just because less people use it.

Just rolls

I could go on about all the advantages to this recipe; the many nutrients from the vegetables and how baking it creates the same moorish, crispy shell with minimum fat, but mainly this is DELICIOUS without any guilt included.

I used carrot, cabbage and courgette as they are some of my favourite veggies plus did I say carrots are 6p from Tesco?! However any vegetables work as it’s a great way to use up the leftovers at the back of the fridge.

Square rolls

Ingredients (makes 16)

  • 2 Carrots (12p)
  • 1 Courgette (30p)
  • 1/2 Savoy Cabbage (35p)
  • 2 Garlic Cloves (8p)
  • 1 Onion (12p)
  • 8 Square Filo Pastry Sheets (75p)
  • 1 tbsp. Sesame Oil (11p)
  • 1 tbsp. White Wine Vinegar (4p)
  • 1 tbsp. Soy Sauce (12p)
  • 1/2 tbsp. Sugar (1p)
  • 1 tsp. Honey (2p)
  • 1/4 tsp. Salt (basically 0p)

Total cost £2.02, which turns out as just under 13p per spring roll. (All prices based on the products in Tesco at time of blog post)

Method

  1. Preheat the oven to 200°C (180°C fan)
  2. Finely chop the onion and garlic and julienne the vegetables (slice finely into strips).
  3. Mix the sesame oil, vinegar, soy sauce, sugar, honey and salt until combined as a dressing.
  4. In a large saucepan or wok either spray on some oil or wipe it on with some kitchen towel to prevent any excess.
  5. Fry the onion then garlic on a low heat until the onion starts to become translucent.
  6. Add in vegetables and some of the dressing whilst increasing the heat, stirring the vegetables so they do not burn. If they start to burn or dry out then add the leftover dressing so it is full of moisture.
  7. Once soft, remove the vegetables from the heat.
  8. Cut each of the filo squares into four smaller ones.
  9. Spoon the vegetables into the filo pastry and roll it up, tucking in the sides and wetting the bottom so it sticks.
  10. Line a baking tray with greaseproof paper and place on all the rolls.
  11. Bake for 16 minutes until they start to go brown and crispy.


I served mine with a Chinese cabbage salad using the same dressing and a mango-avocado dip which was super simple to make. I whizzed up one avocado and mango with juice from a whole lime in a blender and that was it!

Rhubarb & Gooseberry Crumble

There is an abundance of fruit both growing in my garden and piling up in all the shops because it’s finally SUMMER and not only is it sunny and warm but all the delicious fruit is now in season. It’s been a fantastic year for the garden too with our rhubarb plant practically taking over so it’s about time we make use of all this fruit. After finding that a giant pack of gooseberries was only £1.50 in Tesco I had no excuses, so put together a dish that epitomises this fantastic time of year.

Fresh rhubarb from the garden

Rhubarb is also a great thing to grow as it needs such little maintenance, however if you don’t have any then this crumble works just as well with extra gooseberries or any old fruit that you have. Traditionally a crumble is packed full of butter and sugar so is plenty full of guilt, what I tried to create was a desert which still had the same sweetness and comfort but allowed you to have bowl after bowl without bloating you or making you feel bad. It was simple really; replace the sugar with natural sweeteners, cut down the butter and add oats.

It appears the rhubarb leaves also make great capes for dogs


But anyhow, on with the recipe…

Ingredients (serves 6)

  • 550g Rhubarb/Any leftover fruit (Free)
  • 150g Gooseberries (56p)
  • 1 Lemon (28p)
  • 1 tsp Ground ginger (5p)
  • 6 tbsp. Honey (33p)
  • 300g Oats (22p)
  • 100g Wholemeal Flour (7p)
  • 2 tbsp. Butter (10p)
  • 1 tsp Cinnamon (7p)

Total cost £1.68, which turns out as 28p per serving. (All prices based on the products in Tesco at time of blog post)

Method

  1. Preheat the oven to 180°C (160°C fan)
  2. Wash thoroughly and chop the rhubarb into 1 inch chunks, top and tail the gooseberries.
  3.  Add the fruit into the saucepan along with 4 tbsp. of honey, the ginger, 2 tbsp. of water and the zest and juice of the lemon.
  4. Bring to the boil and simmer for 15 minutes until all the rhubarb has gone soft, drain off the excess liquid.
  5. Whilst the fruit is simmering, bring together the rest of the ingredients in a bowl and rub between your fingers until it forms a crumb.
  6. In a lightly greased baking pan add the fruit and top with the crumble mixture, spreading evenly.
  7. Bake in the oven 15 minutes until the crumble hardens and begins to brown on the top.